In the first scan, it's just the paper with blue painter's tape edging it out. I like using that tape as it leaves a nice clean edge and sort of funnels my attention to the window of paper.
this is 9x12 inch Bristol vellum paper. I really like using it as it carries a bit of chaos and adds to the possibilities for interpretation. For the next step, I use a soft brush and powdered graphite. If you are going to try this, try to relax and just let go. Dip the brush in the graphite, tap off the major excess and let the brush just swirl over the paper. I try to not look actually and let chance and chaos take a role here.
Once you've gotten the most of the paper covered you can always add a bit more if design or balance considerations are important but, it's best to just let it go.
Here's the paper with the graphite on it.
Do you see the faces?
When I first start, I like to find the eyes, there is a really strong face on this paper. And, if you don't see something right away, turn the paper around, try it sideways, upside down. whatever. If after all that you still can't find the picture either add more graphite or better yet, put it aside and relax. just let your mind wander for a bit and go back to the paper. let your eyes wander over it and sometimes like a bolt, you'll see the picture.
it's quite remarkable how it happens sometimes.
next, what I do is take a kneaded eraser and pick out the highlights of the eyes especially. Once the picture begins to look out it defines itself, you are basically uncovering what is already there.
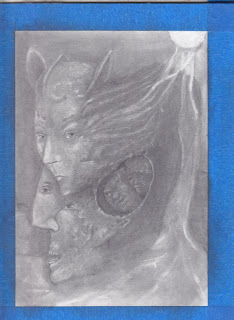
Here is what I got from the above scan. This is the beginning, just bare bones so to speak.
Notice the strength of the top left face. Her eyes came through immediately and would not be denied.
She seems to be implanted in the larger male profile beneath her. I found a sun-like area, or light in the upper right at this point as well. See the dark area that curves? At first I thought it might be the man's ear but later found it to be something else even more interesting and hopefully, revealing.
If you are doing this, continue along with your kneaded eraser and begin to define edges and outlines with a pencil. At this point I mostly use an H2 drawing pencil.
Here's the piece with a bit more definition. It's starting to really speak now.
I found another eye for the lower face and noticed that the almond shaped area was not his ear after all but, at this point had no idea what it was.
After a break and some relaxation, i looked again, brushed it some with my brush and saw something.
It looked like 2 more faces. I wasn't too keen on that idea, mostly for design reasons and wasn't going to put them in but, they were intent on becoming, so, I picked them out with the eraser and defined them with the pencil. I used some B pencil as well in that area. Here's the result.
once I "gave in" and allowed that area to have it's way, I was pleased with the result.
The drawing is beginning to tell me it's name now as well. If you are doing this, you may find that you "hear" something, a name or something that comes to you while working.
This next scan shows more of the detail coming through. When you get to this point, take your time, look for places where structure shows through, giving you an idea of location or mood etc. a bit of stonework was in this picture and, the streams of light are becoming more like a streaming veil, entangling and in some ways defining the figures. Maybe it's a wedding veil?
also, I like to use one of those paper pencils, I forget what they're called, that you smudge and blend with, it makes drawing more like sculpturing I think. also, another tool I like is an eraser pencil. The one I have now has a small vinyl eraser in it and it extends when you click it like a mechanical pencil.
I also like to use a bit of carbon pencil to help define the darkest shadows.
The drawing is almost finished. A few final touches and it will be done.
Here, the veil is more defined, I've used a bit of carbon pencil to help deepen the darkest areas, I've used a soft small brush to smooth and blend as well as the blending paper pencil thing. LOL
a few more touches and it's done.
finally, here is the finished drawing sprayed with fixatif and the tape removed.


No comments:
Post a Comment